before && after這兩個偽類元素功能很相似,都是在元素內部插入新的內容。下面一起看下他們的區別和用法。 1. 官方定義before:元素的內容之前插入新內容。 2. 解釋before 和 after 的功能就是在元素的內部的原有內容之前,或者之后插入新的內容。 3. 語法.demo:before{
}
.demo:after{
}解釋:使用方法如上面,通過在元素選擇器后面增加一個 : 來開始偽類的使用。 4. 兼容性
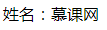
5. 實例<div class="demo">網</div>
 .demo:before{
    content: '姓名:';
}
效果圖:
<!DOCTYPE html>
<html lang="en">
<head>
    <Meta charset="UTF-8">
    <Meta name="viewport" content="width=device-width, initial-scale=1.0">
    <title>Document</title>
    <style>@H_417_301@
        .demo:before{
            content: '姓名:';
        }
    </style>
</head>
<body>
    <div class="demo">網</div>
</body>
</html>
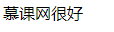
 .demo:after{
    content: '很好';
}
效果圖:
<!DOCTYPE html>
<html lang="en">
<head>
    <Meta charset="UTF-8">
    <Meta name="viewport" content="width=device-width, initial-scale=1.0">
    <title>Document</title>
    <style>@H_417_301@
        .demo:after{
            content: '很好';
        }
    </style>
</head>
<body>
    <div class="demo">網</div>
</body>
</html>
6. 經驗分享這兩個偽類當然不是僅僅插入內容這么簡單,它還有其他的妙用。
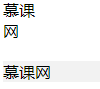
 <div class="demo">
    <div class="item">慕</div>
    <div class="item">課</div>
</div>
<div class="">網</div>
.demo:after{
content: '';
display: block;
clear: both;
}
.item{
float: left;
}效果圖:
<!DOCTYPE html>
<html lang="en">
<head>
<Meta charset="UTF-8">
<Meta name="viewport" content="width=device-width, initial-scale=1.0">
<title>Document</title>
<style>@H_417_301@
.demo:after{
    content: '';
    display: block;
    clear: both;
}
.item{
    float: left;
}
</style>
</head>
<body>
<div class="demo">
<div class="item">慕</div>
<div class="item">課</div>
</div>
<div class="">網</div>
</body>
</html>說明:下面灰色部分是沒有清除浮動的效果,上面是清除浮動的效果。因為清除了浮動所以 “網” 這個字換行了。
<div class="demo">網</div> .demo:before{
content: '';
display:inline-block;
width:px;
height:px;
font-size:px;
line-height:px;
background: url(//img.mukewang.com/wiki/5eea2f6809a8d35e00400040.jpg) center no-repeat;
background-size: cover;
}
<!DOCTYPE html>
<html lang="en">
<head>
<Meta charset="UTF-8">
<Meta name="viewport" content="width=device-width, initial-scale=1.0">
<title>Document</title>
<style>@H_417_301@
.demo:before{
    content: '';
    display:inline-block;
    width:px;
    height:px;
    font-size:px;
    line-height:px;
    background: url(//img.mukewang.com/wiki/5eea2f6809a8d35e00400040.jpg) center  no-repeat;
    background-size: cover;
}
</style>
</head>
<body>
<div class="demo">網</div>
</body>
</html>7. 小結
.demo::before{
}
.demo::after{

} |